1. Introduction
Welcome to the Pay by Link Customization User Guide. This guide will walk you through the steps necessary to personalize and configure the Pay by Link journey.
Who should use this guide?
This guide is designed for merchants who want to customize their customer’s Pay by Link payment journey.
Out of scope
This guide does not cover the PEP API integration. For this, please refer to API documentation.
For more information about PEP via Virtual Terminal, please contact your Market Pay customer manager.
2. Getting Started
While customization is not mandatory, it helps the customer contextualize the payment request, demonstrating its authenticity and providing reassurance.
What can be customized?
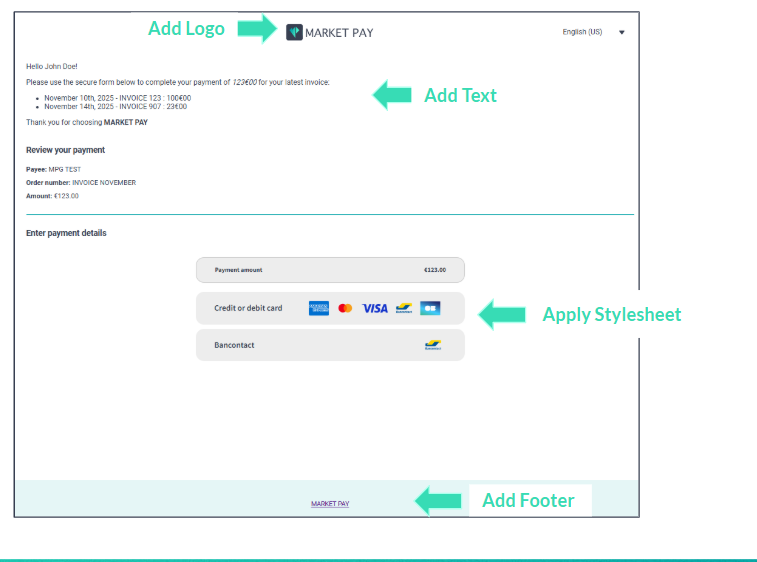
The following elements of the Pay by Link pages are customizable:
Payment page stylesheet
Logo in the header
Header text
Footer text
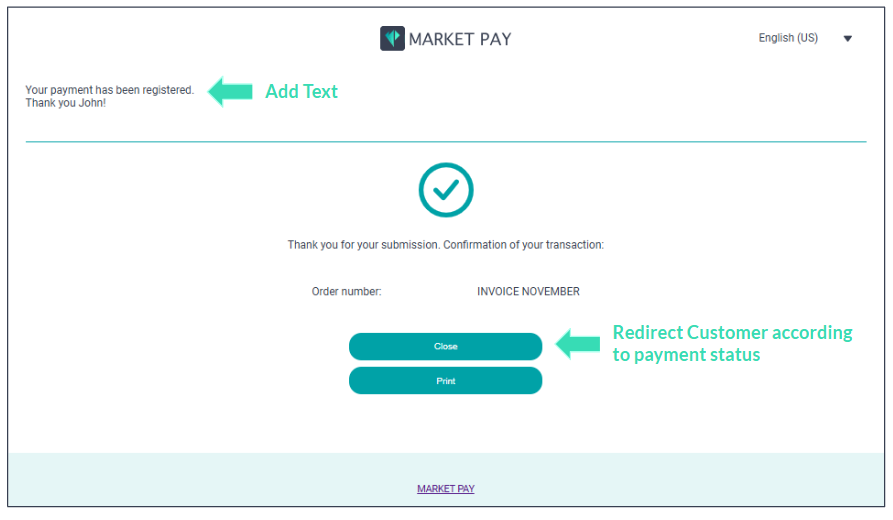
Confirmation text
How to enable Pay by Link customization?
Customization instruction can be sent directly in the PEP API call in the SESSION description.
3. Overview of Customization Options
Element | Description | API |
|---|---|---|
HPP Stylesheet | The Stylesheet is applied on the Hosted Payment Page element on the first page of the Pay by Link journey Format: URL | <SES> <STY> Stylesheet URL <STY> |
Success URL | If the payment is successful, the customer is redirected to the Success URL when they click on the “Close” button on page 2. Format : URL | <SES> <SUU> Success URL <SUU> |
Failure URL | If the payment failed, the customer is redirected to the Success URL when they click on the “Close” button on page 2. Format : URL | <SES> <FUU> Failure URL <FUU> |
Logo | The logo appears on a banner on top of every Pay by Link pages. Format: URL | <SES> <MLG> Logo URL <MLG> |
Default Logo | The default logo appears on every Pay by Link pages if no Logo URL was specify in the API call or in the Virtual Terminal setting. Format: jpeg, gif, png Max 1MB | — |
Custom header text | The text appears on the top of the first page of the Pay by Link journey above the payment section. Format: Text Max 500 characters | <SES> <CHT> Header text <CHT> |
Custom footer text | The text appears at the bottom of every Pay by Link pages Format: Text Max 500 characters | <SES> <CFT> Header text <CFT> |
Custom confirmation text | The text appears on the last page of the Pay by Link journey. Format: Text Max 500 characters | <SES> <CCT> Header text <CCT> |
Page 1
Page 2
4. HPP Stylesheet
The merchant can apply their own look and feel to the payment page by creating a custom stylesheet. In this case, the merchant specifies the URL where the stylesheet is stored in the PEP API call.
Refer to the HPP Styling guide for more details on the payment page customization.
Market Pay stylesheet
https://hpp2.prod.mpg.market-pay.com/hppv22/theme-mp/mp-hpp.css
5. Add Logo
Rendered logo limit size:
max-width: 400px
max-height: 80px
When entering an URL to an externally hosted image file, there is no size limitation (since it is hosted externally, we don’t have any control over this). When PEP renders the logo, the image will be scaled down to the 400 x 80 limit.
6. Add Text
Merchant can customize Header of page 1, Confirmation text page 2 and Footer page 1 and 2 by adding a text using Markdown language.
Markdown tips
Bold: **TEXT**
Italic : *TEXT*
Line break: To create a line break or new line (<br>), end a line with two or more spaces, and then type return
Link: [title](https://www.example.com)
7. Redirect URL
The merchant can customize the URL where the customer will land after the payment is completed and close the page based on the payment status. It can be any URL for example, the merchant’s homepage.